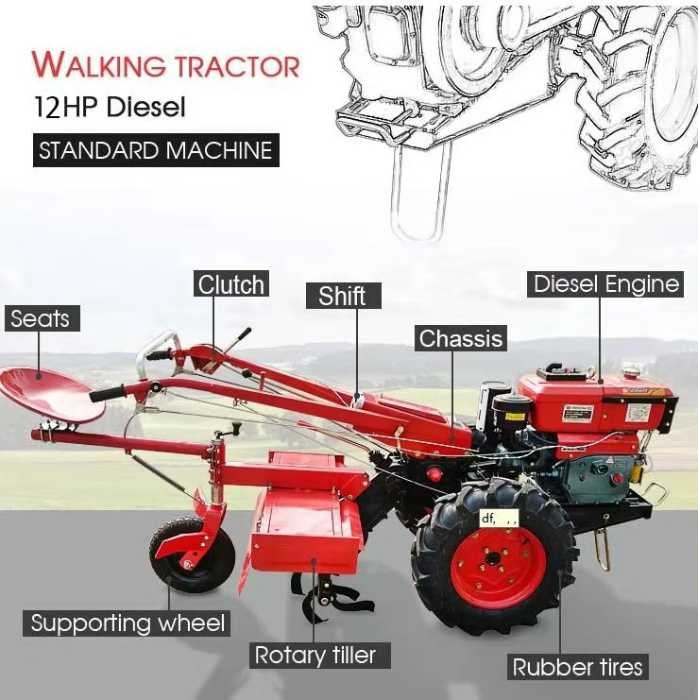
What does a hand tractor do?
A Hand tractor is also called a walking tractor and it is agricultural machinery. It is used to till the soil in order to prepare it for planting. It can be either hand-operated or powered by an engine.
When using a hand tractor, you will need to attach the plow to the back of the machine. The plow will help loosen the soil so that it is easier to plant seeds or seedlings. You will also need to adjust the depth of the plow depending on the type of crop you are planting.
There are more than 20 kinds of attachments that could attach to the hand mini tractor. iron wheels are for paddy or dry land, trailer 1.5 ton capacity for transportation, corn harvesting, wheat harvester, chaff cutter, plow, etc.

The benefits of walking tractors
A walking tractor is a versatile machine that can be used for a variety of tasks such as plowing, tilling, and hoeing. It is also much lighter and easier to maneuver than a traditional tractor, making it ideal for small farms or gardens.
Hand tractor is also very affordable, which makes it a great option for those who are just starting out in farming or gardening. Especially suitable for small-scale farmers. It is very easy to operate.
How to choose the right walking tractors for your needs?
When choosing a farm tractor, it is important to consider your needs and budget. Besides, what kinds of farm work will do, and how big is your farm (acre not over 2ha.)
There are a lot of agriculture machine manufacturers or suppliers in China, but the important thing for farmers is to purchase the tractor suitable for their farm. For dry land, there will need large chassis and big power hand tractors.
How much is a hand tractor?
Power 8hp-22hp, the price range is $420-$1280, warranty is 12 months with enough spare parts. Accessories price between $30-$680. 24 hours customer services and related videos will be sent for each order. For quick quotes or any requests please contact: silvia@pandatractor.com
Hand Tractor Maintenance Tips
Hand tractors in the use of the process, due to wear and tear, loosening, work disorders, and other reasons, some parts may be reduced or completely lose the ability to work. At the same time, the lubricating oil, and cooling water will also be with the use of time extension, gradually reducing and deteriorating.
If not timely inspection, adjustment, tightening, replacement, cleaning, adding, and other maintenance will certainly shorten the service life of the tractor. Therefore, we must take maintenance of the machine on-time technical maintenance.

Shift maintenance
Shift maintenance is the maintenance carried out by the driver before or after each shift. The content includes 1. removing the tractor’s external surface mud, dust, and oil. 2. Check the engine oil seal has no oil leakage, check the engine water tank has no leakage, and check the engine air intake pipe has no leakage. If there are three leaks, should identify the cause, and timely elimination.
Check the tightness of the bolts and nuts of each part. If they are loose, they should be tightened in time. Check whether the fuel of the diesel engine is sufficient, check whether the oil of the diesel engine is sufficient, check whether the cooling water of the diesel engine is sufficient, and if it is insufficient, it should be added in time.
Check the oil level of the gearbox. Add if insufficient. Check that the joystick hinge connection points are secure. Fill the sliding surface of the clutch release claw with oil. Check clutch release and engagement. When the handle is pulled to the “off” position, the power should be completely cut off and the gearshift should be easy and comfortable. Otherwise, the clutch should be adjusted.
Check the tightness of the v-belt. Too loose and too tight will affect the power output of the diesel engine and accelerate the wear of the v-belt, which should be adjusted in time. Check the reliability and flexibility of the steering. Pinch the right steering handle, the tractor should turn to the right. Pinch the left steering handle, and the tractor should turn to the left. If a fault is found, remove it. Check the transmission shift position is correct and smooth. If there is a “messy gear” phenomenon, must be immediately excluded.
Check the reliability of the brake. Check, the clutch handle from “engaged” to “separated” position, the tractor should stop slowly. The clutch handle from “engage” to “brake” position, the tractor should stop quickly. If the tires have a rolling phenomenon that occurs, for the brake is not sensitive, must be immediately excluded. Check the diesel engine chassis has no abnormal sound, such as abnormal, find the cause, and be excluded.
Check the exhaust pipe and silencer, and check if the diesel engine exhaust pipe and cylinder head connection gasket are leaking. If there is air leakage, the gasket should be replaced to prevent misfire or injury. Check the connection between the exhaust pipe and silencer, if there is loose one, tighten the lock nut.
Regular maintenance
Regular maintenance is based on the maintenance of each shift, the tractor every 100 hours of work, or 200 kg of fuel consumption after the maintenance. This maintenance is also known as primary maintenance. Contents include:
Clean the air filter
Before cleaning, check the air filter of the connection of the pipeline seal is good. Check the parts, if there is damage or air leakage should be promptly repaired or replaced. Check whether the air filter nut and clamping ring are loose. If there is, they should be tightened in time. When cleaning, open the air filter. Clean the filter with clean diesel oil. Clean the oil storage tray. Clean the center tube. After cleaning, replace the oil in the oil pan. The oil level should be controlled at the oil level mark. Install in reverse order. Some machines have a dry filter. To clean the dry filter, gently tap the surface of the cartridge by hand to remove the floating dust on the surface. Then use a brush to remove the dust from the crevices of the filter element. Finally, install the air filter.
Cleaning the diesel filter
When cleaning, unclog the vent holes in the fuel tank cap. Remove any impurities from the fuel filter. After cleaning, place the filter back on. Tighten the fuel tank cap. Remove the diesel coarse filter and filter element and check if there is any damage or the end cap is de-glued, if there is, the filter element should be replaced. If the filter element is not damaged, clean the coarse filter element with clean diesel oil or paraffin. Then, install in reverse order. Remove the diesel fine filter. Open the fine filter, take out the cartridge and check if the cartridge is damaged. If there is damage, the filter element should be replaced. Without damage, use clean paraffin or diesel oil and a soft brush and clean the surface of the filter element. When installing, pay attention to the correct position of the sealing ring. Avoid diesel fuel entering the injection pump without filtering and aggravating the wear of the precision part.
Changing the oil
Changing the oil has already been described in the maintenance paragraph after a break-in. Care should also be taken to check the oil consumption frequently. When checking, observe the dipstick, the oil level should not be significantly lower. If the oil consumption is excessive, the engine should be checked at a service station.
Check that the crankcase vent pipe is clear To check, remove the end cover. Remove the ventilation unit. Check that the inside of the ventilation unit is not blocked or filled with oil sludge. Unclog the holes.
Check that the spring-loaded valve tabs of the crankcase ventilation check valve should fit on the base plate. Otherwise, replace the crankshaft ventilator. Install the end caps in reverse order.
Adjusting the clutch release gap
When adjusting, put the clutch and brake handle into the “closed” position. Check the ball head of the release lever and the release bearing. A clearance of approx. 0.5 mm should be maintained between the ball head of the release lever and the release bearing.
Also, check that the three-ball heads are in the same plane of rotation. If the separation gap is too large or if the three-ball heads are not in the same plane of rotation, an adjustment should be made. To adjust, loosen the lock nut on the adjusting bolt and rotate the adjusting nut inwards to reduce the clearance, and outwards to increase the clearance. Until the clearance meets the requirements. Finally, lock the nut. If, the separation gap and ball position do not need to be adjusted, scrub the separation jaws and bearing cover bevels and lubricate with oil or grease.
Adjusting the free travel of the clutch brake handle
The free travel of the clutch brake handle should be 25 to 30 mm. When adjustment is required, loosen the lock nut. Adjust the length of the clutch lever so that the free travel of the clutch brake handle meets the requirements.
Adjusting the brake
The clutch brake handle from the clutch “away” position, pull back to the brake position, and the tractor should brake. If the brake handle is not pulled back to the brake position, the brake works, indicating that the brake is too early, and will cause serious wear and tear on the brake. If the brake handle from the separation position pulls back, the brake does not brake, indicating that the brake is too late and prone to safety accidents.
Braking too early or too late is incorrect and must be adjusted. Before adjusting the brake, the free travel of the clutch must be adjusted. So that when the brake handle is released from engagement to braking, the clutch is disengaged first and the brake is applied later. When the handle is released from braking back to engaging, the brake is sent open first and then the clutch is engaged.
After the clutch has been adjusted, pull the clutch brake handle from the “off” position to the “brake” position. As the clutch lever moves back, the brake should work. If the brake is not sensitive, the length of the brake lever should be adjusted. To adjust, remove the cotter pin, loosen the adjusting nut and turn the brake lever. If the brake lever is shortened, the brake will advance; if the brake lever is longer, the brake will lag. Finally, fix the locking nut and cotter pin.
Adjusting the steering lever length
To ensure good engagement and disengagement of the clutch, the distance between the steering handle and the handlebar sleeve should be 20 to 30 mm. If the distance is too small, the steering sensitivity will be affected. Too large a distance will increase the wear of the clutch teeth.
To adjust, loosen the lock nut, pull out the cotter pin at the connection between the steering rod and the steering handle, remove the steering rod and adjust the length of the rod. If the distance is too large, adjust the lever longer. If the distance is too small, shorten the lever. Finally, lock the nut.